Radon, I hate that stuff.
Radon, known to his Periodic chums as Rn, is a colorless, odorless, tasteless (how boring is that) noble gas. This naturally occurring radioactive gas is created when uranium, thorium, or radium break down. According to the CDC, Radon is the second leading cause of lung cancer in the US.
Uranium, thorium and radium occur naturally in small quantities in the earth and soil so that’s the birthplace of most Radon. Soil and earth are denser than Radon so it seeps upward. In turn Radon is actually 7.5 times denser than air so you would have thought that it would be happy to stay close to the earth and not bother us, however it’s still a gas so will propagate easily around your house due to air movements and pressure difference.
So how does Radon get into your super insulated and hermetically sealed house anyway? Most causes are:
- A. Cracks in concrete slabs
- B. Spaces behind brick veneer walls that rest on uncapped hollow-block foundations
- C. Pores and cracks in concrete blocks
- D. Floor-wall joints
- E. Exposed soil, as in a sump or crawl space
- F. Weeping (drain) tile, if drained to an open sump
- G. Mortar joints
- H. Loose fitting pipe penetrations
- I. Open tops of block walls
- J. Building materials, such as brick, concrete, rock
- K. Well water
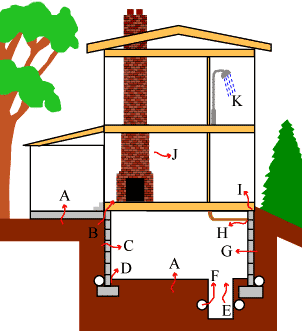
Image and list courtesy of Radon Testing Lab
Radon came onto our radar as our architect had included pipes within our basement floor for Radon mitigation (removal for us common folk) which would be something our plumber would do. We did some research and the first step seemed be testing for Radon. We picked up some DIY tests which are $10 a pop and are small packs of charcoal which you leave in your basement for 48 hours and then post them off for testing. We bought two and put one in side of the basement. We posted them off pretty much together. Aimee just got the results for her kit but according to Fedex mine is still a week away from being delivered.
So far the news is good and we seem to be lower than 1.7 1.7 pCi/L (picocurie per litre)


From the EPA these are the risks that Radon presents
| Radon Level | If 1,000 people who smoked were exposed to this level over a lifetime… | The risk of cancer from radon exposure compares to… | WHAT TO DO: Stop smoking and… |
|---|---|---|---|
| 20 pCi/L | About 260 people could get lung cancer | 250 times the risk of drowning | Fix your home |
| 10 pCi/L | About 150 people could get lung cancer | 200 times the risk of dying in a home fire | Fix your home |
| 8 pCi/L | About 120 people could get lung cancer | 30 times the risk of dying in a fall | Fix your home |
| 4 pCi/L | About 62 people could get lung cancer | 5 times the risk of dying in a car crash | Fix your home |
| 2 pCi/L | About 32 people could get lung cancer | 6 times the risk of dying from poison | Consider fixing between 2 and 4 pCi/L |
| 1.3 pCi/L | About 20 people could get lung cancer | (Average indoor radon level) | (Reducing radon levels below 2 pCi/L is difficult) |
| 0.4 pCi/L | (Average outdoor radon level) | (Reducing radon levels below 2 pCi/L is difficult) | |
| Note: If you are a former smoker, your risk may be lower. If you have never smoked your risk is much lower. | |||
We’ll wait to see what my results are before we decide to do anything, but that said it may be good idea to at least put in a pipe before we have a concrete poor. We will keep you posted.
Sleep well everyone and dream not of what is below you ….


