Three steps forward, two back

Back again to the front door. We’re trying to get the opening correct for the door we restored a few years ago. The current door (circa 70s, 80s) doesn’t align vertically with the door above it, so our aim is to shift the door a bit to the left so it does – we believe the original door was centered. The new door is 3″ wider than the current door but we will still hope to have side windows to let in a bit more light.

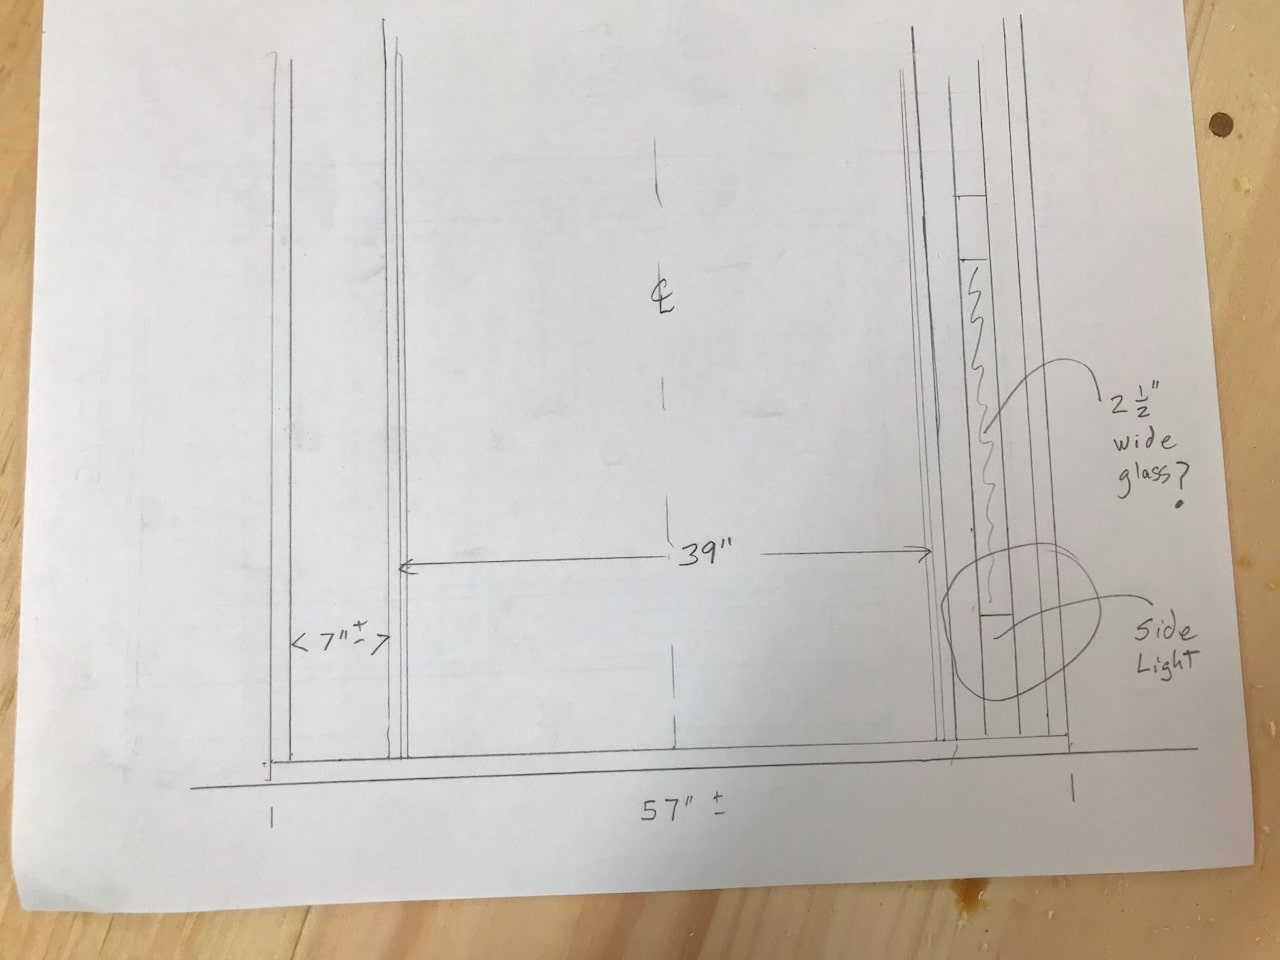
We decided to enlist the help of the talented Josh Finn to build us a new door frame and to install the door. Josh’s initial sketch (below) shows that with the current door opening the side windows would only be 2.5″ wide which isn’t very much so I’ve been working on making the door way gap a little larger. As it turned out the pressure treated wood I added to either side of the newly extended wall wasn’t square – not sure how that happened, user error or maybe the mortar pushed it out, anyway it was bugging me so I ripped both of them off, which in effect undid a couple of days work – bummer but I want to get it right.

I then got back to my least favourite task of chiseling and grinding away at the wall, annoying as we had just rebuilt one side of the wall. Grinding away the lime mortar is easy as it still reasonably soft (lime mortar takes weeks to cure), but the rocks are really tough to grind down. From the pictures there doesn’t look like there are many rocks, but if you scroll to the bottom, you can see them after I sprayed the lime with water. I estimate 12 hours to finish the grinding. It’s also very messy, with stuff going everywhere and clouds of dust.

First pass of the grinding removed 1″ – 2″ of the new wall and then I decided to remove another 1″ – 2″ but this time, not extending to the outside so the pressure treated wooden door jams aren’t visible from the outside. You can see the the laser line I’m trying to keep to in the photos below.

Hopefully now, our side windows will be at least 4″ wide which I think is reasonable.

Because the ground walls aren’t perfect, we sprayed them with lime mortar and then I plan to grind the surface flat so the door jams fits snugly. Lime mortar is fast to grind away, just very messy. While we’re spraying mortar we also started to spray the few remaining untreated walls in the house. There was a bit of prep as we had to remove all the lose stuff which covered most of the surface.

Repairing floor joists

So having just repaired the rim joist, it’s now time to replace the rotten floor joists, three to be precise. Due to rot, none of these attached to the rim joist and were just hanging mid air and two of them had huge chunks cut out of them, possibly for duct work so they were severely compromised.

Like most projects on the house I wanted to do a respectful job so instead of butt jointing in a new piece and sistering on a 2×8″ (adding extra wood to strengthen a damaged beam), I thought I’d do some joint work. I’ll still add a 2×8″ but only on one side as my joint will be stronger than a butt joint. I’m not sure this joint has a name, it’s slightly similar to a scarf joint.

I probably would have done a fancier job if it wasn’t so difficult to cut, standing on a ladder is not the easiest position to cut from. For the first beam I made some templates which I attached to the beam and used a Sawzall to rough cut, finishing off with a hand saw and plane – that was hard work. I then had the idea of using a trim router and that worked out great. I did have to to do multiple passes as a trim router as the name suggests isn’t supposed to remove a lot of wood in one pass. It probably took me about 3 – 4 hours to cut a single joist like this, luckily I only have three.

As I didn’t have any wood with similar dimensions to the joist, I laminated three pieces of old growth lumber together. I used West System epoxy so this will be a stronger than wood bond, plus I’m running 3/8″ bolts vertically through the joint as an extra safe guard. The reason the center piece is lighter is because I planed it down.

And this is how they finally turned out and I will secure these floor joists to the rim joist with 3/16″ thick steel angle brackets. I know these aren’t the finest or strongest joints, but I think they are decent, plus the addition of another sistered 2×8″ will make every rock solid.

This whole job, repairing wall, replacing rim and floor joists has taken me a few months – I wasn’t expecting it to take this long, but in most endeavours the first time you do something there’s a learning curve.

Shifting Dirt

During the excavation of our basement floor and foundation drain we accumulated a large quantity of sandy soil. We’ve been pondering about what to do with the dirt for last year or two. We thought of getting a skip (dumpster), finding someone who wanted dirt (people do) and then we realised that we had the perfect spot for it at the back of our garden – don’t know why we didn’t think of this earlier.

Aimee kindly took on this task and over the last 6 weeks or so has been slowly moving the soil, two small buckets at a time. It’s been a long slog, especially in the hot humid weather we’ve been having, but it’s a good work out.

I didn’t start recording this until Aimee had removed about a foot of dirt from in front of the garage and I accidentley deleted the last video when we finally cleared the driveway.

It’s nice to have reclaimed our driveway and make our property a bit more presentable and we’re also hoping to remove the dirt from the front of the house as well.