As the end of the year draws nigh, I’d like to recap on what we’ve been up to over the year, highlighting any highs and lows.
January
We started the year well with a generous donation of brass window hardware from the Architectural Resource Center in New Hampshire. Thank you Bob that was extremely generous and it was a big ray of sunshine that we needed badly.
February
In February we restored some drafting chairs which we picked up for a decent price. They didn’t look great with dents and gouges and supposedly one of the chairs was missing some parts – turned out to be a spring which I replaced for less than a dollar. We removed all the old paint, filled in all the gouges etc. and then stained the wood. All in all they turned out pretty good and will serve us for many years.
March
In March we picked up a lovely old Craftsman drill press built around the late 1930’s. This will probably see us both out! There is something in these old tools that feels most pleasing, visually and functionally.
April
With spring in full swing we planted a Magnolia tree and named it “Big Nan” after my grandmother. Aimee had a Magnolia tree when she was young and so did Big Nan! It’s probably grown 9″ since we planted it and had some nice blossoms.
Spurned out by the generous gift from ARC we also started making a prototype sash window and came up with some rather pleasing hidden sash pockets.
We finished off April with prep work for the ground floor pour. First steps were to remove a huge amount of sandy soil and rather too much chiseling away of footings – glad that job is over.
May
We continued with basement prep and I finished off our test sash window, which I’m pleased to say turned out pretty good.
Sashes of the window go up and down…
June
We started the month off with a huge load of gravel for the basement. We had two loads delivered and in total we shifted about 20 tons of the stuff in the wheel barrow, that took a good few weekends and evenings. In the process we removed the staircase so it wouldn’t get in the way of the pour. Prior to the gravel we dug trenches and installed some electrical conduit so after the pour we could thread the power lines into the electrical room.
Someone dumped some gravel…
July
I ordered a bit too much gravel so I decided to lay down some footings for a small patio wall in front of the house. Digging the trench was a bit of a pain as we had already dumped about 3′ of soil from the basement on it so the trench needed to be about 4′ deep. Anyway that got rid of some of the gravel, the rest we will use in our french drains. In addition this footing will be used to dump any excess concrete from the pour – no point in wasting it.
Front patio wall
We followed this by leveling the gravel (to within +/- 1/8″ – it took us about a week to do this) and then hired a compactor for the day to compact it.
Compaction, compaction, compaction
August
Decided to lay some concrete for the patio footings as we wouldn’t have that much spare from the pour and also because soil was starting to fall in etc.
Patio wall footing
September
This month was all about pour prep, we had to cut back a lot more of the footings but eventually got the vapour barrier and foam insulation down and started to put down the rebar mesh.
Inching closer to the pour
October
Work on the basement is almost done, pex tubing has been installed over the rebar.
Pour in a week or so
I happened to share the time lapse of us installing our Stego vapour barrier with the nice folks at Stego Industries and in response Dave Kartunen, Media Consultant at Stego, came to video interview us. Lovely chap supporting a great product. Can’t wait to see the final interview.
Radiant heating pex installed
We pressure tested the system and thankfully it held up.
Lastly it was quite a surprise to see our house on an estate agents flier!!
Look familiar?
November
In preparation for the pour we had our work inspected by the local building inspector and it passed. We waited for a few weeks and Al Riozzi (AJR Masonry) finally managed to do the pour. We were thankful as it was starting to get cold and concrete doesn’t like the cold.
They Came, They Poured, They Concreted
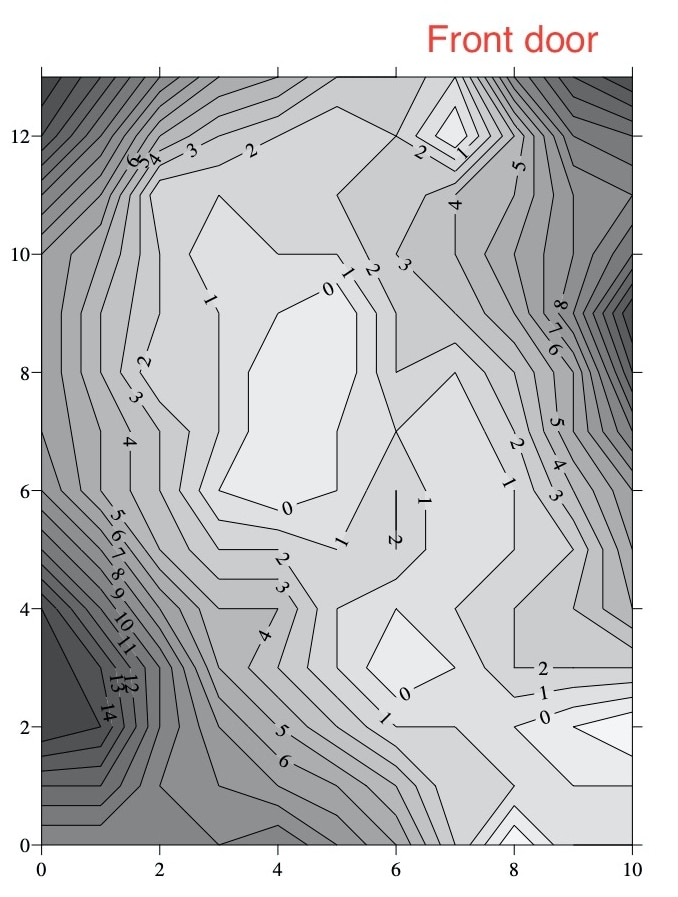
After it had cured we noticed that they hadn’t gone all the way to the walls, odd I thought but we patched that up. I then began to notice that some areas seemed uneven so we took some random measurements and found a height deviation of 1 & 3/8″ (later revised to 1 & 1/18″).
They Came, They Poured, They Concreted, They #@$&ed Up
December
To get a better idea of what was going on with the floor I divided it into a 2′ grid and with the help of friends, Paul and Sue, took depth readings, you can see the results in this post.
Contour map of ground floor
I exchanged a few emails with Al Riozzi (AJR Masonry), but at the end of the day he didn’t seem to want to fix it even though he said that 1 & 1/8″ was unacceptable. His argument was that the pour was over 4 & 1/2″ deep (as stated in our first contract) and it was, it was probably 4 & 3/4″ and this was caused by the compaction of the gravel. Al Riozzi did note this two weeks before the pour and he also commented on it on the day of the pour, saying he would have to order extra concrete, so there shouldn’t have been any surprises there. To cut a long story short Al Riozzi and his team underestimated the amount of concrete and just tried to blend away the difference and then tried to blame it on us. Watch the video of them laying it, they aren’t even checking the depth against their laser.
We were very disappointed that Al Riozzi (AJR Masonry) didn’t have the integrity to admit his mistake and fix the issue. We spent months prepping the basement and I think we did a very good job, all to be spoilt by shoddy and amateurish work in half a day. I would not recommend this Saugerties based contractor whatsoever. Something is broken in this world.
It’s getting pretty cold here and I have to say that our enthusiasm for the project is flagging. I’m still finding projects that I can do at our apartment such as restore our old basement bannister post and mill wood for our sash windows.
So in reflection we started the year off on a high with the generous support from Bob at the Architectural Resource Center and Stego Industries and are unfortunately leaving it on a low with the poor workmanship of Al Riozzi (AJR Masonry). We’re doing the best we can but it’s getting harder to bounce back from knocks.
Here’s to a healthy, peaceful and cheerful 2022 to all of you that have been following our progress. I special call out to Chris and Ian who are constantly giving us positive feedback – thank you, it means a lot.
Best David & Aimee, 2021