Recently we’ve been thinking that it might be nice to sit down whilst doing some work at DM. Our work bench is higher than most tables so chairs don’t cut it. What we need are some workshop chairs or stools. I did have a few workshop swivel stools with back rests but we sold them when we left Oakland, sigh. By the way we’re looking for something that fits the aesthetics of DM, so no chrome or thick vinyl clad foam seat .
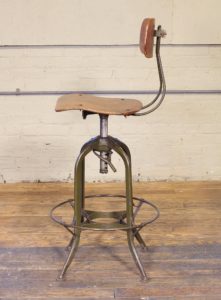
I was toying with the idea of making some but adding a swivel seat put me off the idea. For some time I was looking on craigslist and ebay for stools but nothing ever decent came up, but then I came across something called a “Toledo” drafting chair which looked exactly what we wanted, seat was at a good height with foot and backrests and it also swiveled. My mistake was that I had been searching for workshop stool when I should have been searching for drafting stool. Since I discovered the Toledo I’ve spoken to a few friends about it and for most this chair was already on their wish list. Aimee and I had never heard of it.
Below is a vintage Toledo and these sell for $300 – $1,000 per chair so we we aren’t going ‘chic vintage’.
A got this snippet about the history of these chairs from industrial furniture:
What came to be known as the Toledo Metal Furniture Company was started as Uhl’s Cycle Emporium at 1021-23 Monroe Street in Toledo, Ohio in 1898. Philip E. Uhl (president) and Clement Richard Uhl (VP/supt) founded the company on $85. Others of the 10 Uhl brothers joined the firm, including Joseph Ferdinand Louis Uhl (secretary/GM), Otto G., Charles, Henry and Robert Uhl. Joseph, a 1-legged concert violinist, also directed the family Concert Band and Orchestra.
As the popularity of automobiles reduced the market for bicycles (1900-1910), the Uhls shifted their focus to manufacturing ice cream parlor furniture, renaming the company Uhl Art Steel, and in 1904 incorporating as the Toledo Metal Furniture company. By 1920 capital stock reached $300,000, there were over 150 employees and the product mix had been expanded to include office and classroom furniture.
Fortunately for us we found that there are modern day reproductions of these chairs, the most popular being from Restoration Hardware. The hunt was on! Luckily these chairs seem to be pretty popular and they come up often on ebay and facebook. Most people seem to use them as kitchen or bar stools which is fine for us as once we’ve finished with them in the workshop, we’ll use them in our kitchen or close by.
The best deal I came across were these. They did look a bit beat up with scratches, chips, a broken lift mechanism and the backs looked bent. I offered the seller $160 which was accepted and we went to pick them up last weekend, a 50 minute drive.


The sellers were a lovely couple, Michael and Patty, who run an antiques and furnishing store, called Amenia Station. If you’re ever in the area I recommend popping in for a browse, you never know what you might find, plus there is a lovely cafe next door. Back to chairs, yes they did look beat up, but they felt rock solid and the backs weren’t bent, just the way the adjustable back rests were set. We agreed to buy them and Michael kindly let us have them for $150 for all 4!!! Luckily they did fit in the car.
Back home we decided to sand all the paint off and repair the chip with epoxy and it so happened that the lift mechanism was also fixable.


We’re in the process of sanding and refinishing these chairs and we’ll post an update when they are finished. They won’t be perfect but we love them. We have a chair always for you Martin.