These are our tips on applying self-leveling compound and I’d read it only if you are planning to do something similar [editor: It’s boring]. We applied ours over ≈ 800 sq ft of floor so some of the following may not be applicable if your area is a lot less or more.
First off it’s good to understand what self-leveling compound is and what it can and cannot do. For starters it’s basically very fine Portland cement, fine enough that the particles can be suspended in a pancake type mix. So imagine you poured a bucket of pancake mix on a floor, yes it would spread out and self level to a certain degree but don’t expect it to suddenly spread out and cover all of your floor. So if one half of your room is 1″ lower than the other and you poured your bucket of pancake mix on the higher side, don’t expect it to suddenly rush down to the lower side. Sure it will start to move in that direction but that’s all you can expect. Workable time for this product is about 20 minutes max, so no dawdling.
Hopefully these tips will help if you have a similar project, so in no particular order here we go:
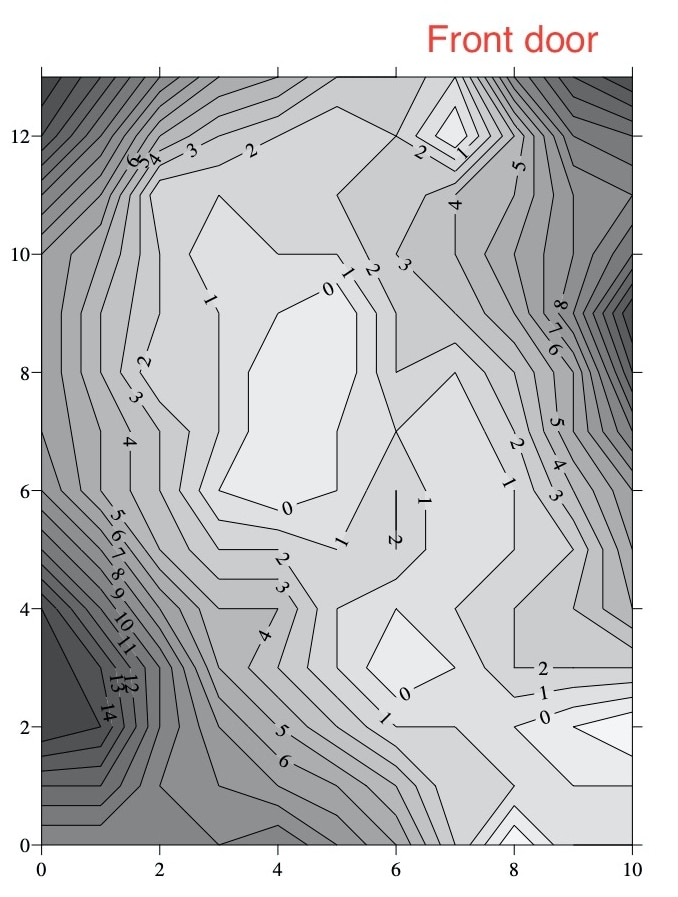
- Get an idea of the levels, i.e. where are the high and low spots. We did this with a laser and created a contour map. If I were to do this again I probably would have just used the Ardex self-leveling pegs. After discovering the product I placed them in a 3×3 foot grid pattern, set the laser at the desired height and cut them down to height.
- Use the above mentioned self-leveling pegs. Without these it’s difficult to know when you’ve reached the correct depth.
- Get a laser that creates a beam close to the ground. I eventually bought this one as it could place the beam about 6mm off the floor. The one I was initially using could only go down to about 10mm.
- If you have deep areas consider doing multiple pours. In fact without a pump and a cement truck we couldn’t have done the main room in one pour (≈ 650 sq ft). If you do multiple pours remember to re-prime each time.
- Make sure the surface is clean prior to applying the primer and follow instructions exactly.
- Start early in the morning before it gets too warm. We also added ice to cool down the water as that gave a slightly longer working time.
- Assemble a team of competent people. I thought a team of 5 was ideal for our job and this is how this is how we split the team up:
- One person measuring out water.
- One person mixing.
- Two person opening compound and adding it with water to mixing bucket.
- Same two people carrying mixed compound and pouring it on floor.
- One person spreading and rolling the compound and deciding where the next bucket should be poured.
- You need your team to work like clockwork so explain to each person what their tasks are and walk them through the process. Once you start mixing you shouldn’t have anyone asking you what to do next.
- Assemble the correct tools:
- A paddle mixer with the correct paddle for self leveling compound. We used a Collomix.
- Serrated rubber squeegee for spreading compound.
- Spiked roller for removing bubbles and blending in of different batches.
- Scrappers to remove any unmixed product from building up on the mixing bucket
- A good serrated knife for cutting open the bags of compound. You’d be surprised what a big difference such a simple tool makes especially when you have to hold the 40lb bag up when cutting it open, multiplied by 50 bags.
- Spiked shoes which allow you to walk over the poured compound without messing it up. Super slippery though so you have to tread lightly.
- A couple of 17 gal mixing buckets. Having two meant that we could mix and pour faster.
- Safety equipment, latex gloves and dust masks.
And that’s about it folks. Ultimately you’d want to get your initial concrete pour as flat as possible. As it was we used about 125 bags of the self leveling compound and at $41 a bag, you’re talking over $5k.
Ultimately I’m glad we got it done, sure there were sleepless nights, but now we have a fantastic flat floor and if anyone reading this wants some tips on this process we will gladly share our knowledge.