It’s a new dawn. It’s a new door, and we’re feeling good …

Finally, we have our front door back. No more climbing up and down a ladder thirty times a day. I can’t believe that we made the door six years ago, where did the time go?

It’s a pretty thick and hefty door, but very sturdy, made mostly from locally sourced red oak; it also includes some wood from what we think was the original downstairs front door. Maybe that makes it a restoration, rather than a new door?

I wasn’t sure how we were going to get it downstairs without damaging it, and there was no way we could slide it down the ladder. In the end, we used a panel dolly, which, with Joe’s help, we managed to move it without any damage.

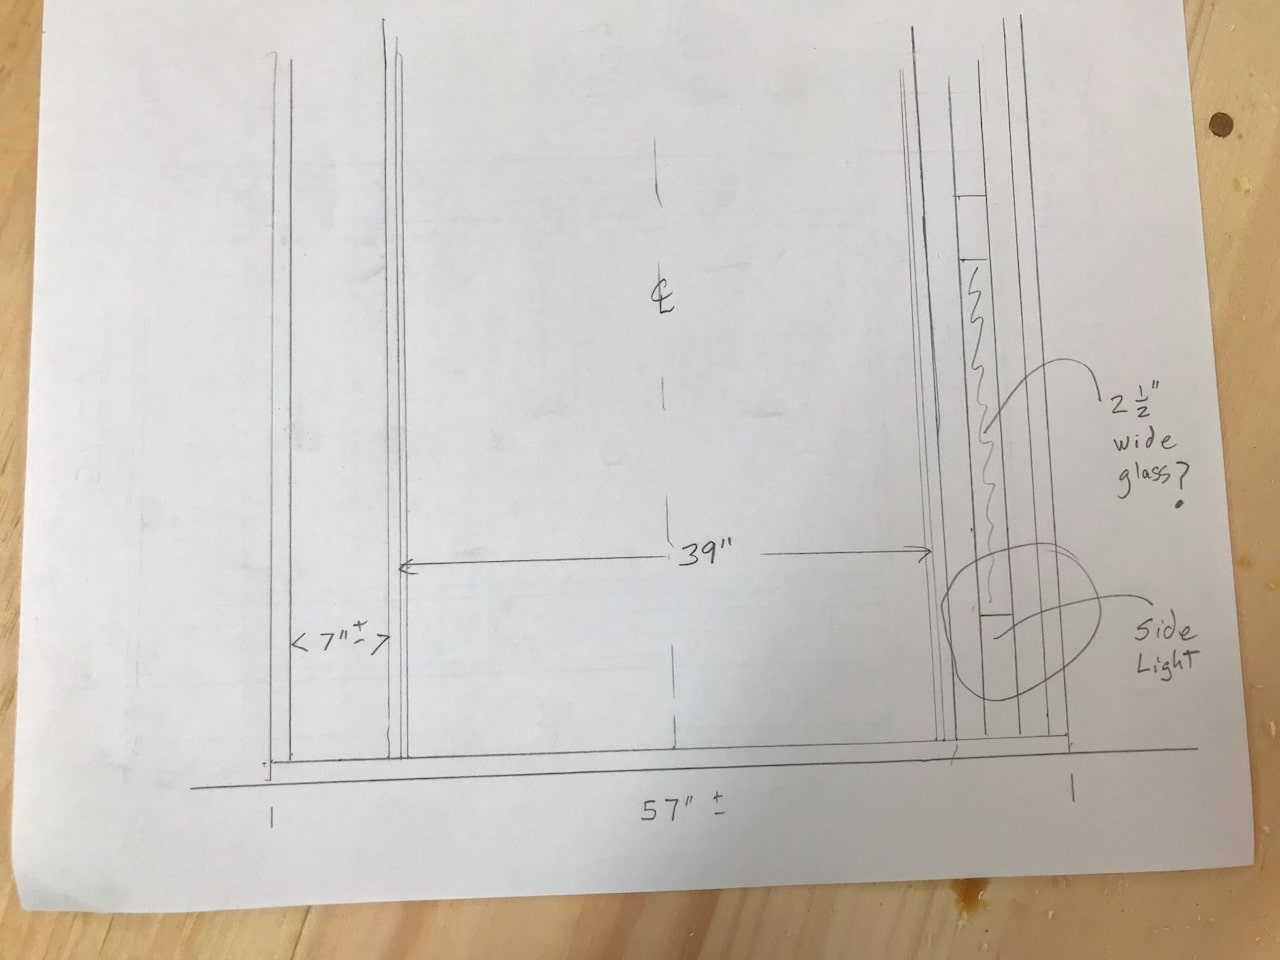
Once inside, the first job was to glaze the windows. Glazing isn’t my finest skill, though I am getting better, and it seemed easier to glaze when the door was flat. That done, we had the task of hanging it, and what a nightmare that turned out to be. Did I mention that the door is heavy? Not sure how much it weighs, but it’s probably north of 70 lbs. When you watch videos of people hanging doors, they always seem to be lightweight doors that a person can hold in one hand while screwing in the hinges with the other, not so in this case.

What saved us was this door dolly. It’s amazing what products you find when you need them. With this, we could adjust the height so the hinges pretty much lined up. As the door was heavy, it was difficult to keep it vertical, but with various wedges, we got it close. Then the fun started.

First, the door wouldn’t close because the hinges were too far into the door frame, so the door came off. Holes were glued and dowelled, and new hinge recesses were chiseled out. Once I got the door to close, it was fine except for the top right corner, which was sticking out 1/2″. Was the door warped? I was really hoping it wasn’t, as I didn’t want to make a new one.

A day later, I checked the door for warps, and luckily, it was pretty straight with any deviation less than 1/16″. Then I checked the door frame, which was also less than 1/16″ off. Armed with that, the door should fit, so I went about moving the hinges, possibly another ten times, each time gluing and dowelling the old holes. Without the door dolly, I may have given up. In the end, I got the fit to be within +/- 1/16″, which is good enough for me. Next time I make a door, it won’t be so heavy, lesson learned.

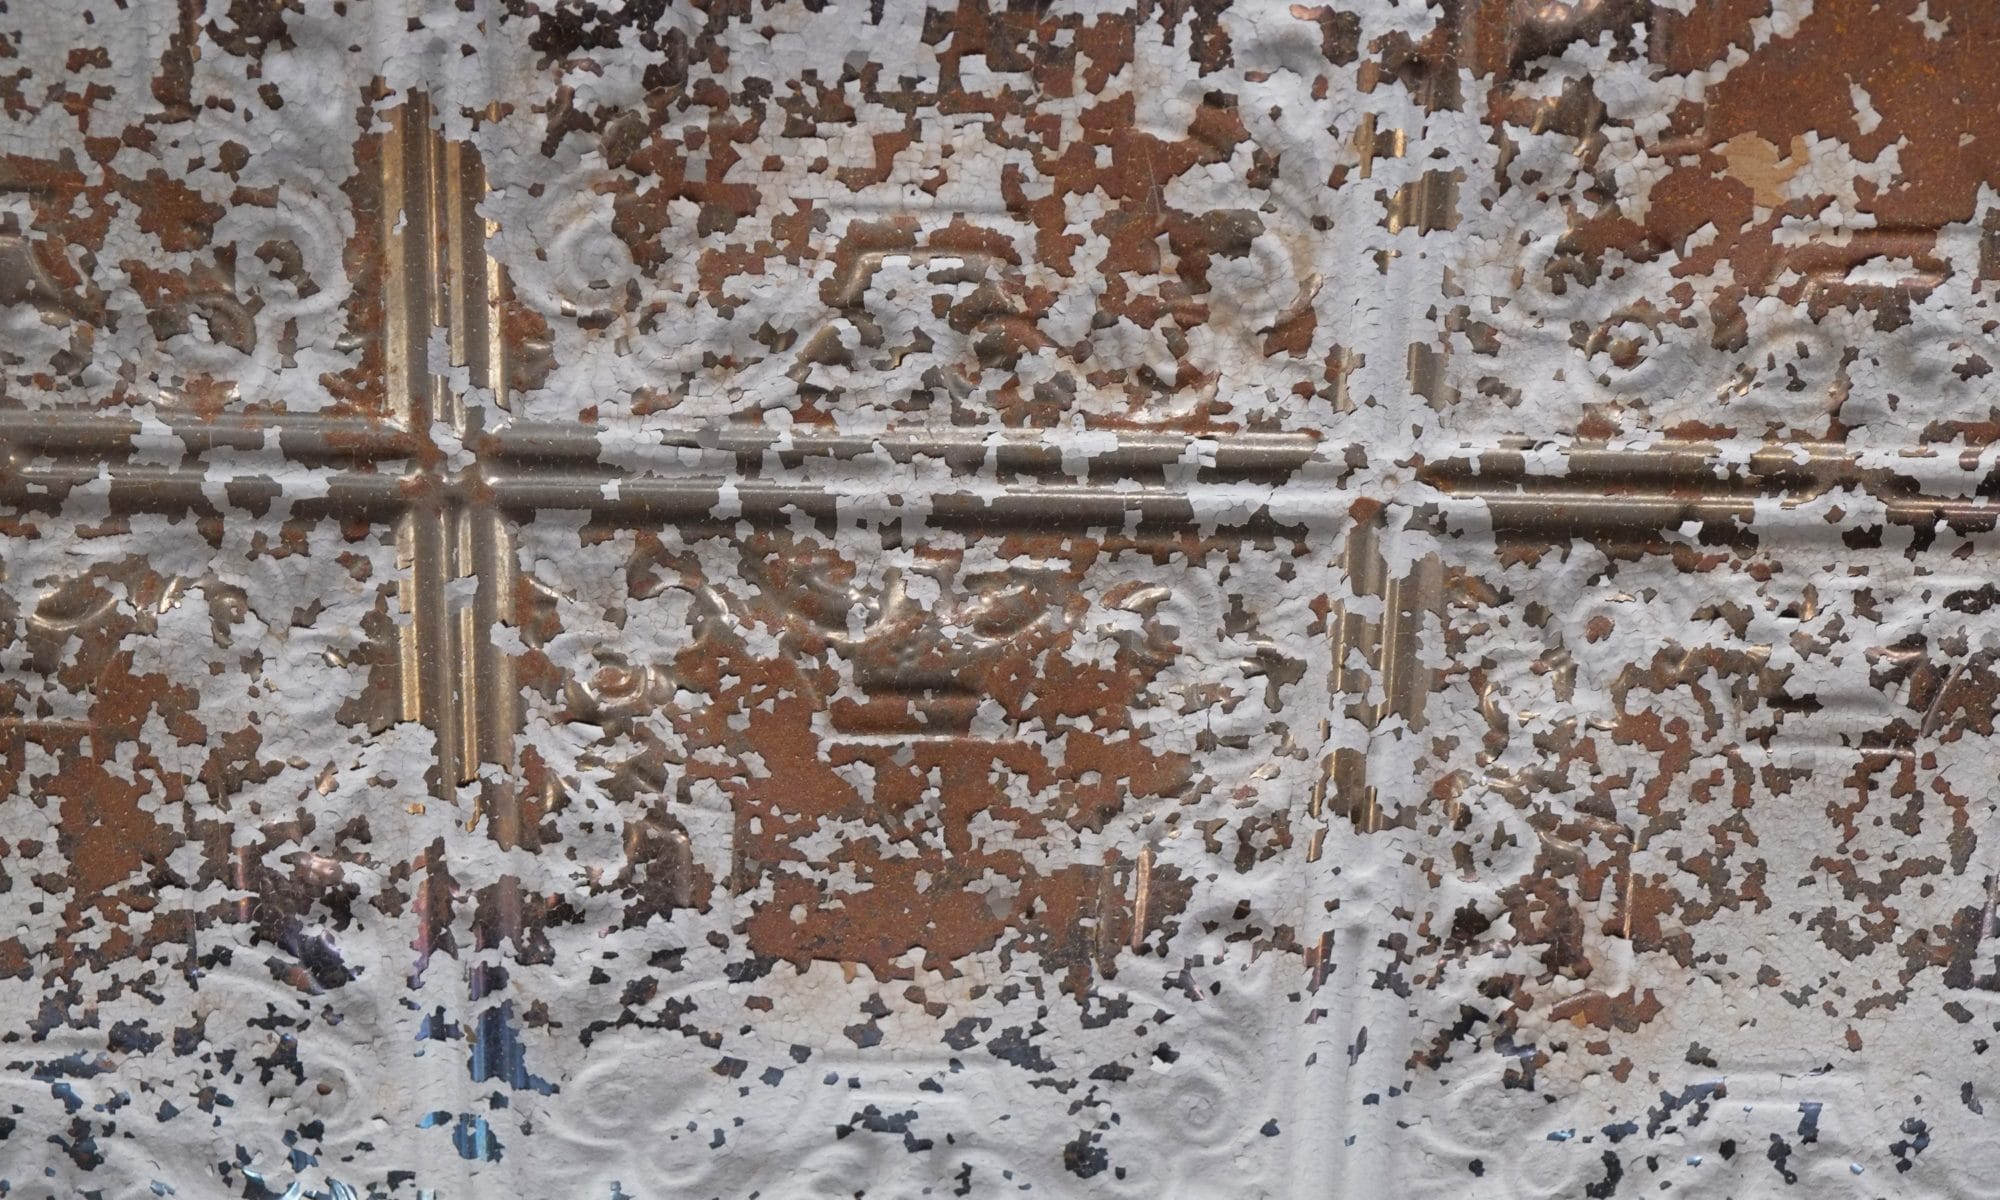
The design on the panes is Moroccan. We used a Cricut vinyl cutter to cut the design, and after applying it, we acid-etched the glass to give the gold paint a better surface to bond to. Overall, we’re very pleased with how it turned out. Thank you, Susan, for your Cricut expertise 🙂

Still a bit of work to do on the entrance way. The letterbox and some of the trim have been installed, but quite a bit of trim still needs to be made, and I also need to paint the glazing putty. You’ll notice that I use Kreg pocket screws for the framing, which seems easier than trying to plant a couple of nails accurately, plus I can undo stuff if I make a mistake, which I’ve needed to do before. The screws take longer, but that’s how I roll.

Probably not clear from the second photo, but I did sister two 2×8’s onto the original header beam that goes over the front door. This should make that beam pretty beefy, and when that area gets closed up, it shouldn’t need any attention for many, many decades.

Welcome to the Bishop

We’ve had a flat arch doorway into our utility room, and it was very dodgy. If it fell, it would have dropped a couple of hundred lbs. of rock and mortar on your head. As we’re are gearing up to get the plumber and electrician in, we thought we’d better fix this.

The picture below is after patching the arch up quite a bit, and even then, I’d never stand under it for long.

As you can see we added a fair amount of rebar and, because lime is caustic, I degreased, de-rusted and coated the rebar in epoxy, yes a pain to do, but this is a house we want to last.

Constructing and setting up the form took a few days, but I think we got it almost right. One thing I wished I had done was to get a better curve when I bent the rebar, if I had, it would have given us an extra 1.5″ in height to the already low doorway. Aimee will be able to pass through it unhindered, and I may scrape my head, but old age and gravity, in time, will allow us free passage with ease 🙂 I will round the corners on both sides so if you do bonk your head, you won’t hit a sharp edge.

Sorry I ran put of disk space. Yes, current results are rough, with low and high spots, but that will be fixed.

We left form and mortar to cure for a week, spraying with water, every day, to help the cure. That done, we applied another scratch coat of mortar which which filled in the majority of the undulations. The following day, it was time to remove the form.

Overall we like the arch, it matches the arch of our front door. Small subtle details like this add up to the overall experience, I think at least.

Three steps forward, two back

Back again to the front door. We’re trying to get the opening correct for the door we restored a few years ago. The current door (circa 70s, 80s) doesn’t align vertically with the door above it, so our aim is to shift the door a bit to the left so it does – we believe the original door was centered. The new door is 3″ wider than the current door but we will still hope to have side windows to let in a bit more light.

We decided to enlist the help of the talented Josh Finn to build us a new door frame and to install the door. Josh’s initial sketch (below) shows that with the current door opening the side windows would only be 2.5″ wide which isn’t very much so I’ve been working on making the door way gap a little larger. As it turned out the pressure treated wood I added to either side of the newly extended wall wasn’t square – not sure how that happened, user error or maybe the mortar pushed it out, anyway it was bugging me so I ripped both of them off, which in effect undid a couple of days work – bummer but I want to get it right.

I then got back to my least favourite task of chiseling and grinding away at the wall, annoying as we had just rebuilt one side of the wall. Grinding away the lime mortar is easy as it still reasonably soft (lime mortar takes weeks to cure), but the rocks are really tough to grind down. From the pictures there doesn’t look like there are many rocks, but if you scroll to the bottom, you can see them after I sprayed the lime with water. I estimate 12 hours to finish the grinding. It’s also very messy, with stuff going everywhere and clouds of dust.

First pass of the grinding removed 1″ – 2″ of the new wall and then I decided to remove another 1″ – 2″ but this time, not extending to the outside so the pressure treated wooden door jams aren’t visible from the outside. You can see the the laser line I’m trying to keep to in the photos below.

Hopefully now, our side windows will be at least 4″ wide which I think is reasonable.

Because the ground walls aren’t perfect, we sprayed them with lime mortar and then I plan to grind the surface flat so the door jams fits snugly. Lime mortar is fast to grind away, just very messy. While we’re spraying mortar we also started to spray the few remaining untreated walls in the house. There was a bit of prep as we had to remove all the lose stuff which covered most of the surface.

Improving front doorway

The ground floor door isn’t original, it’s pretty beat up and doesn’t align vertically with the arched door above it. When it was installed they removed 6″ – 12″ of the masonry wall to fit it in and as our new door won’t have such large side windows we needed to rebuild the wall.

You can see from the picture below that the right side of the lower door aligns with the above door, but the left side doesn’t, hence why we are fixing this. New door will be 3″ wider.

First step was to drill the existing wall and epoxy in a bunch of fiber glass rebar to help tie in the new section. This was followed by attaching a piece 2×12″ of pressure treated wood which will form part of the new frame. Into the 2×12″ I screwed in large anchor screws so when the mortar sets the 2×12″ will be fully secured.

This weekend Aimee was in NYC so I started mixing the lime mortar on Saturday morning. I was on my third mix when I noticed smoke coming from the electric motor on the mixer. I switched it off immediately and basically had to stop work. In the evening I started looking for a new mixer, the box stores sold the mixer I was after but it would take a week or so to get delivered and I wanted the mixer tomorrow, so my search turned to second hand mixers on Marketplace and Craigslist.

There was nothing decent locally so I extended my search, the same mixer that failed (Harbor Freight) turned up in Albany for $150 so that was a contender, then I thought, well Aimee is in NYC and she has the Beast so my search turned south and bingo, a Kushlan mixer had just turned up in Staten Island for $50. I jumped on it and contacted Aimee and by Sunday afternoon we had a great mixer and what a great deal that was, thank you Ilya. This mixer has a slightly higher HP motor and is so quiet compared to the Harbor Freight mixer that Joe has been kindly lending to us.

I intend to fix the mixer that Joe lent us and a knowegable friend, Oli, suggested that it could have been the starter capacitor that had burnt out and and not the motor so today I ordered a new capacitor and hopefully that will fix the issue, if not it will require a new motor. We never mixed large batches and I think the biggest load we were making was less that a half a bucket full, however we were mixing for a long time. With Portland cement you can probably mix up a batch in a few minutes but lime mortar requires that you mix it for at least 15 minutes, so components probably got hotter.

As we added the shuttering we packed in as much stone as we could to help save on mortar and provide some strength.

There are some expected blemishes but those will all be cleaned up when we add a plaster coat to the walls and then it will be seamless.

I was expecting to get more done this last weekend, especially as it was a 3 day weekend, alas as usual we didn’t get as much done as expected. I did however remove the left hand panel and pretty much ground back the wall to where it needed to be. Grinding the mortar away is easy, but stone is hard, plus it’s terribly dusting with sand and grit flying everywhere.

The left hand side is now boarded up and this week I’ll be installing another 2×12 to match the left, with mortar etc.

Fixing Door Openings

It seems a good idea that we fix our doorways before we parge/plaster the interior walls. The doorways are pretty uneven so we added some shuttering and slowly filled up behind with lime mortar mixed with a bit of fiberglass and as many stones that we could fit in. You can see Aimee hammering in the mortar to reduce voids.

Progress is a bit slow but at least we’ll have a pretty square opening for a door to be installed. This door is to the bedroom and we had the builders cut this opening in the wall for us. The second doorway we need to fix is to the boiler room and for this we plan to have an arch, how fancy is that and the arch should be a fun project. The reason for the netting is that the masonry above the door is extremely fragile and if it fell on you it would likely kill you.

We did have a plastering fail yesterday. I removed the shuttering and 90% of the plaster came away from the wall. Not sure what went wrong there but it could have been any combination of the following:

  1. Messed up the ratio of the mix
  2. Didn’t mix for long enough
  3. Removed the shuttering too soon
  4. Mix was too dry
  5. Didn’t pack in in well enough

We’ll probably never know why but I suspect a combination of all of the above with the possible exception of (5).

Thanks again Joe and Deborah for the loan of your cement mixer.