I dedicate this post to Jess Graves, who left us, far too early. Jess you were a very special person and will be missed so very much. Our thoughts go out to Luke and family.
Apologies for the lack of posts. This is due to a combination of demanding day (evening and weekend) job and cold miserable weather. Until the weather gets a bit better, jobs around the house will probably be limited to gardening and interior design, in particular tiles for the downstairs.
A while ago, we decided to have a tiled floor in the bathroom and hallway and after shopping around we found these lovely cement tiles from Zia Tiles†, in particular the Star and Cross tiles. We ordered some samples and they looked lovely, only snag was the price, $17 a sq. ft. which, including shipping and tax from Los Angeles, would have cost around $6,000. If this was the only expenditure on the house, we would have probably just bought them but alas it’s not.
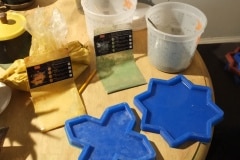
We searched for alternatives but we didn’t really find anything else we liked. So then the idea of making some tiles, came to us. We consulted with my cousin Judith, a ceramics expert, and Judith thought it was definitely something we should try, so we started looking around for tutorials. We did find a few and in a nutshell cement tiles start off with a mould to which you first add an 1/8″ layer of pigmented mortar, followed by regular mortar, with chopped fiberglass added for strength.
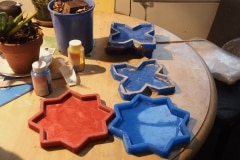
First step was finding some moulds and I was lucky to come across Athena Molds who could kindly made us some custom “Star and Cross” moulds of the same dimensions as the Zia tiles. The Zia tiles were about 5/8″ thick but I thought 1/2″ deep moulds would be sufficient, time will tell. In total we have four stars and four crosses, so we can make a bunch at a time.
For the pigments we settled on Direct Colors, as they offer a great range of colours, they’ve been about for over twenty years (i.e. they know what they’re doing) and they manufacture in the US.
Initial results were promising but it got tricky when it came to deciding the final design. First we fancied terracotta, then greens, then green and terracotta, then black and white etc. you get the idea. As we’re using these tiles downstairs, which will be fairly shaded, we wanted something that would lighten up the place a little, but at the same time not be garish and jarring to the eye.
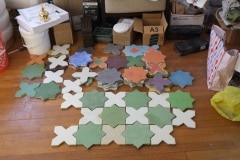
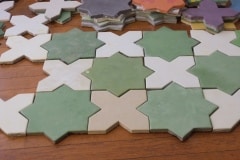
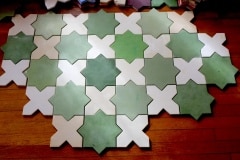
After much tile making and debate we decided on cream crosses and green stars (and that may change!) and as the tiles are individually made they’ll have an interesting color variation. Possible we will may change the colours subtlety as we move from hallway to bathroom.
This is roughly how they’ll look. We’ll drop some of the tiles if we don’t like the shade etc., for instance some of the crosses below are too white.
And now for some technical stuff, boring unless you want to make your own.
- Mortar (cement, water and sand). Because we’re using pigments, I initially looked for a white mortar mix, my favourite was Rockite, which was fast setting and gave a beautiful, void free finish, only downside was the cost, $15 for a 5lb bag, which didn’t go far. I also experimented with using Rockite purely for the pigment layer and regular fast setting mortar for the remaining. This seemed to work, but, for a few tiles, the pigment layer didn’t bond well and started to show signs of delamination. Due to this and the high cost I decided to look at a few other mortars, eventually settling on the ‘RapidSet Mortar Mix’, which costs about $18 for a 55lb bag. When using this I used pigment throughout the thickness of the tile.
- Pigment. I’ve been happy using the pigments from DirectColors. I did try some from Amazon, which were lovely and vibrant, but which also made me suspicious of how long they would last. In the end I’m sticking with DirectColors as they’re made in the US and I trust them. Your choice of pigment and final colour really dictates what colour mortar you need to use, if you’re after light colours then you’re best off starting with a whitish mortar, however if you’re after more earthy colours then you can get away with the regular grey mortar mixes.
- Sealant. Cement tiles need to be sealed as they’re porous, spill some Chateau Lafite, Rothschild and you’ll stain them. For our sealant I’ve chosen Penetrating Concrete Sealer from Green Building Supplies. What I like about this water based sealant, is its low viscosity, it needs two or three coats before being fully saturated, so the sealant is going deep into the tile as opposed to a lot of other sealers which just seem to sit on the surface.
- Reinforcement. I’m adding chopped fiberglass to the mortar mix to increase it’s strength.
- Anti-slip. The last thing I want are the tiles to become an ice skating rink when wet, so I’ll be applying a final top coat sealer with an anti-slip additive.
† We heard back from someone that ours are not ‘cement tiles’ like the Zia tiles – those are subjected to immense pressure in a hydraulic press and thereby undergo a chemical transformation which hardens them. Ours are cast concrete and we’re hoping they will be hard enough.


Well you never cease to amaze me and that’s meant as a compliment. They look really good and much more affordable.
As ever, thank you Chris for your kind words .
This is beyond! They look so cool. Good luck with it. And may your friend Jess live forever in your memory.
Thank you Beth for your kind words, they are very much appreciated and help keep our enthusiasm from waning.
I’m beginning to think Dave and Aimee don’t want to move into Disaster Mansion.
Just wait until they start making stain glass windows!
As always it looks great.
The sooner you finish the house and move in, the quicker you can focus your attention of something important, like an old car.
Thank you Ian, the tile making is something we can do in the warmth 🙂 too cold for house work. Stained glass, now that’s an idea!!!!